Puppet device
Sections
CollapseWith Puppet device, you can manage network devices, such as routers, switches, firewalls, and Internet of Things (IOT) devices, without installing a Puppet agent on them. Devices that cannot run Puppet applications require a Puppet agent to act as a proxy. The proxy manages certificates, collects facts, retrieves and applies catalogs, and stores reports on behalf of a device.
Puppet device runs on both *nix and Windows. The Puppet device application combines some of the
functionality of the Puppet apply and Puppet resource applications. For details about running
the Puppet device application, see the
puppet device man
page.
The Puppet device model
In a typical deployment model, a Puppet agent is installed on each system managed by Puppet. However, not all systems can have agents installed on them.
For these devices, you can configure a Puppet agent on another system which connects to the API or CLI of the device, and acts as a proxy between the device and the primaryPuppet server.
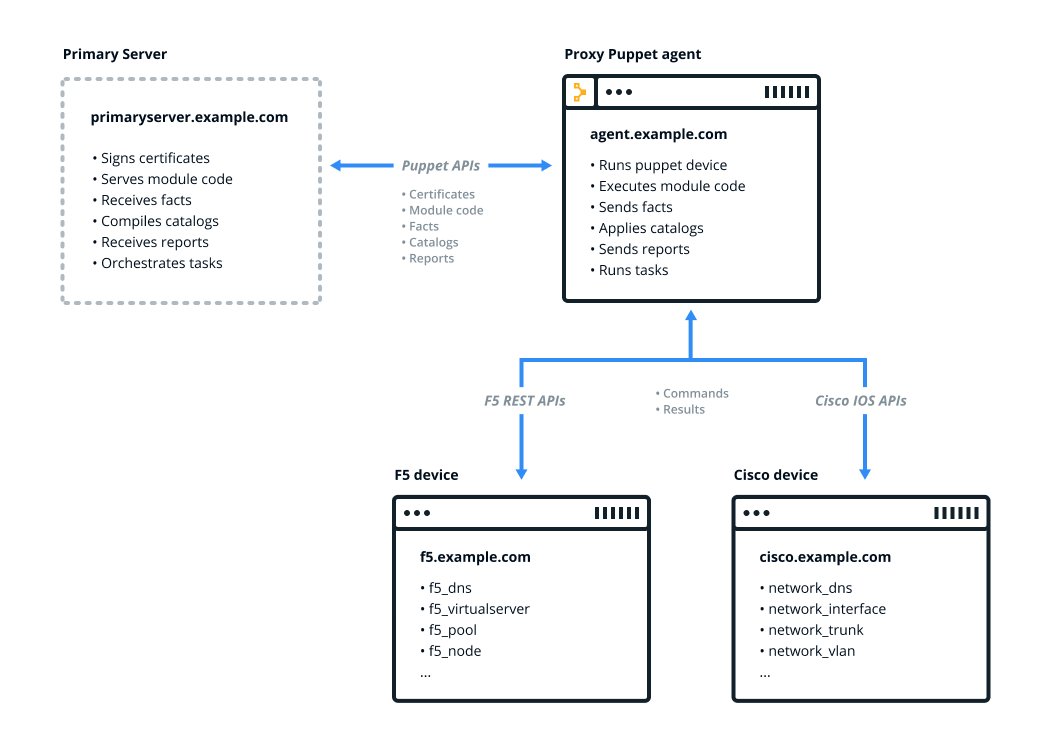
In the diagram below, Puppet device is on a proxy Puppet agent (agent.example.com) and is being used to manage an F5 load balancer (f5.example.com) and a Cisco switch (cisco.example.com).
Puppet device’s run environment
Puppet device runs as a single process in the foreground that manages devices, rather than as a daemon or service like a Puppet agent.
User
The puppet
device command runs with the privileges of the user who runs it.
Run Puppet device as:
Root on *nix
Either LocalService or a member of the Administrators group on Windows
Logging
By default, Puppet device outputs directly
to the terminal, which is valuable for interactive use. When you run it as a cron
job or scheduled task, use the logdest option to direct the output to a file.
--logdest syslog option to log to the *nix syslog service:
puppet device --verbose --logdest syslogCopied!/var/log/messages on Linux, and /var/log/system.log on Mac OS X. For
example, to view these logs on Linux,
run:tail /var/log/messagesCopied!--logdest eventlog option, which logs to
the Windows Event Log, for example:
puppet device --verbose --logdest eventlogCopied!To view these logs on Windows, click Control Panel → System and Security → Administrative Tools → Event Viewer.
--logdest
                    <FILE> option
, which logs to the file specified by <FILE>, for
example:
puppet device --verbose --logdest /var/log/puppetlabs/puppet/device.log
Copied!
You can increase the logging level with the --debug and --verbose options.
In addition to local logging, Puppet device submits reports to the primary Puppet server after each run. These reports contain standard data from the Puppet run, including any corrective changes.
Network access
Puppet device creates outbound network connections to the devices it manages. It requires network connectivity to the devices via their API or CLI. It never accepts inbound network connections.
Installing device modules
You need to install the device module for each device you want to manage on the primary Puppet server.
For example, to install the f5 and cisco_ios device modules on the primary server, run the following commands:
$ sudo puppet module install f5-f5Copied!$ sudo puppet module install puppetlabs-cisco_iosCopied!Configuring Puppet device on the proxy Puppet agent
You can specify multiple devices in device.conf, which is configurable with
the deviceconfig setting on
the proxy agent.
For example, to configure an F5 and a Cisco IOS device, add the
following lines to the device.conf file:
[f5.example.com]
type f5
url https://username:password@f5.example.com

[cisco.example.com]
type cisco_ios
url file:///etc/puppetlabs/puppet/devices/cisco.example.com.yamlCopied!For the url, specify the device’s connection string. The connection string varies
by device module. In the first example above, the F5 device connection credentials are
included in the url
device.conf file,
because that is how the F5 module stores credentials. However, the Cisco IOS module uses
the Puppet Resource API, which stores that information in
a separate credentials file. So, Cisco IOS devices would also have a /etc/puppetlabs/puppet/devices/<device cert
name>.conf file similar to the following content:
{
"address": "cisco.example.com"
"port": 22
"username": "username"
"password": "password"
"enable_password": "password"
}
}
Copied!
For more information, see device.conf.
Classify the proxy Puppet agent for the device
Some device modules require the proxy Puppet agent to be classified with the base class of the device module to install or configure resources required by the module. Refer to the specific device module README for details.
To classify proxy Puppet agent:
Classify the device
Classify the device with resources to manage its configuration.
The examples below manage DNS settings on an F5 and a Cisco IOS device.
Get and set data using Puppet device
The traditional Puppet apply
and Puppet resource applications cannot target device
resources: running puppet resource
--target <DEVICE> does not return data from the target device. Instead, use
Puppet device to get data from devices, and to set data on
devices. The following are optional parameters.
Get device data with the resource parameter
puppet device --resource <RESOURCE> --target <DEVICE>Copied!resource parameter
to retrieve resources from the target device. For example, to return the DNS values for
example F5 and Cisco IOS
devices:sudo puppet device --resource f5_dns --target f5.example.com
sudo puppet device --resource network_dns --target cisco.example.comCopied!
Set device data with the apply parameter
puppet device --verbose --apply <FILE> --target <DEVICE>Copied!--apply parameter to
set a local manifest to manage resources on a remote device. For example, to apply a Puppet manifest to the F5 and Cisco devices:
sudo puppet device --verbose --apply manifest.pp --target f5.example.com
sudo puppet device --verbose --apply manifest.pp --target cisco.example.comCopied!
View device facts with the facts parameter
puppet device --verbose --facts --target <DEVICE>Copied!--facts parameter to
display the facts of a remote target. For example, to display facts on a device:
sudo puppet device --verbose --facts --target f5.example.comCopied!Managing devices using Puppet device
Running the puppet device or puppet-device command (without --resource or --apply options) tells the proxy agent to retrieve catalogs from the primary server and
apply them to the remote devices listed in the device.conf file.
To run Puppet device on demand and for all
of the devices in device.conf
, run:
sudo puppet device --verboseCopied!To run Puppet device for only one of the
multiple devices in the device.conf file, specify a --target option:
$ sudo puppet device -verbose --target f5.example.comCopied!device.conf file, create a separate configuration file
containing the devices you want to manage, and specify the file with the --deviceconfig
option:$ sudo puppet device --verbose --deviceconfig /path/to/custom-device.confCopied!To set up a cron job to run Puppet device on a recurring schedule, run:
$ sudo puppet resource cron puppet-device ensure=present user=root minute=30 command='/opt/puppetlabs/bin/puppet device --verbose --logdest syslog'Copied!Example
Follow the steps below to run Puppet device in a
production environment, using cisco_ios as an example.
Install the module on the primary Puppet server:
sudo puppet module install puppetlabs-cisco_ios.- Include the module on the proxy Puppet agent by adding the following line to the primary server’s
site.ppfile:include cisco_iosCopied! - Edit
device.confon the proxy Puppet agent:[cisco.example.com] type cisco_ios url file:///etc/puppetlabs/puppet/devices/cisco.example.com.yamlCopied! - Create the
cisco.example.comcredentials file required by modules that use the Puppet Resource API:{ "address": "cisco.example.com" "port": 22 "username": "username" "password": "password" "enable_password": "password" }Copied! Request a certificate on the proxy Puppet agent:
sudo puppet device --verbose --waitforcert 0 --target
                cisco.example.com
Sign the certificate on the primary server:
sudo puppetserver ca sign
                cisco.example.com
Run
puppet deviceon the proxy Puppet agent to test the credentials:sudo puppet device --target cisco.example.com
Automating device management using the puppetlabs device_manager module
The puppetlabs-device_manager module manages the configuration files used by the
Puppet device application, applies the base class of
configured device modules, and provides additional resources for scheduling and
orchestrating Puppet device runs on proxy Puppet agents.
For more information, see the module README.
Troubleshooting Puppet device
These options are useful for troubleshooting Puppet device command results.
--debug or -d
|
Enables debugging |
--trace or -t
|
Enables stack tracing if Ruby fails |
--verbose or -v
|
Enables detailed reporting |