Managing Windows configurations
Sections
CollapseThis page covers the different ways you can use Puppet Enterprise (PE) to manage your Windows configurations, including creating local group and user accounts.
Basic tasks and concepts in Windows
This section is meant to help familiarize you with several common tasks used in Puppet Enterprise (PE) with Windows agents, and explain the concepts and reasons behind performing them.
Practice tasks
In other locations in the documentation, these can be found as steps in tasks, but they are not explained as thoroughly.
Write a simple manifest
Puppet manifest files are lists of resources that have a unique title and a set of named attributes that describe the desired state.
You need a text editor, for example Visual Studio Code (VS Code), to create manifest files. Puppet has an extension for VS Code that supports syntax highlighting of the Puppet language. Editors like Notepad++ or Notepad won't highlight Puppet syntax, but can also be used to create manifests.
Manifest files are written in Puppet code, a domain specific language (DSL) that defines the desired state of resources on a system, such as files, users, and packages. Puppet compiles these text-based manifests into catalogs, and uses those to apply configuration changes.
Note the following details in this file resource example:
-
Puppet uses a basic syntax of
type { title: }, wheretypeis the resource type — in this case it’sfile. -
The resource title (the value before the
:) isC:\\Temp\\foo.txt. The file resource uses the title to determine where to create the file on disk. A resource title must always be unique within a given manifest. -
The
ensureparameter is set topresentto create the file on disk, if it's not already present. Forfiletype resources, you can also use the valueabsent, which removes the file from disk if it exists. -
The
contentparameter is set toThis is some text in my file, which writes that value to the file.
Validate your manifest with puppet parser validate
You can validate that a manifest's syntax is correct by
using the command puppet parser
validate
Launch the Puppet command prompt
A lot of common interactions with Puppet are done via the command line.
The Puppet command prompt has a few details worth noting:
- Several important batch files live in the current working
directory,
C:\Program Files\Puppet
                  Labs\Puppet\bin
. The most important of these batch files ispuppet.bat. Puppet is a Ruby based application, andpuppet.batis a wrapper around executing Puppet code throughruby.exe. -
Running the command prompt with Puppet rather than just the default Windows command prompt ensures that all of the Puppet tooling is in PATH, even if you change to a different directory.
Simulate a Puppet run with --noop
Puppet has a switch that you can use to test if manifests make the intended changes. This is referred to as non-enforcement or no-op mode.
puppet apply c:\myfiles\file.pp --noop in the command
prompt:
C:\Program Files\Puppet Labs\Puppet\bin>puppet apply c:\myfiles\file.pp --noop
Notice: Compiled catalog for win-User.localdomain in environment production in 0.45 seconds
Notice: /Stage[main]/MainFile[C:\Temp\foo.txt]/ensure: current value absent, should be present (noop)
Notice: Class[Main]: Would have triggered 'refresh' from 1 events
Notice: Stage[main]: Would have triggered 'refresh' from 1 events
Notice: Applied catalog in 0.03 seconds
Puppet shows you the changes it would make, but does not actually make the changes. It would create a new file at C:\Temp\foo.txt, but it hasn't, because you used --noop.
Enforce the desired state with puppet apply
When the output of the simulation shows the changes you
intend to make, you can start enforcing these changes with the puppet apply command.
puppet
                        apply c:\myfiles\file.pp
.
To see more details about what this command did, you can
specify additional options, such as --trace, --debug, or --verbose, which can help you diagnose problematic code. If
puppet apply fails, Puppet outputs a full stack trace.
Puppet enforces the resource state you've described
in file.pp, in this case
guaranteeing that a file (c:\Temp\foo.txt) is present and has the contents This is some text in my file.
Understanding idempotency
A key feature of Puppet is its idempotency: the ability to repeatedly apply a manifest to guarantee a desired resource state on a system, with the same results every time.
If a given resource is already in the desired state, Puppet performs no actions. If a given resource is not in the desired state, Puppet takes whatever action is necessary to put the resource into the desired state. Idempotency enables Puppet to simulate resource changes without performing them, and lets you set up configuration management one time, fixing configuration drift without recreating resources from scratch each time Puppet runs.
To demonstrate how Puppet can be applied
repeatedly to get the same results, change the manifest at c:\myfiles\file.pp to the following:
file { 'C:\\Temp\\foo.txt':
  ensure   => present,
  content  => 'I have changed my file content.'
}
Apply the manifest by running puppet apply c:\myfiles\file.pp. Open c:\Temp\foo.txt and notice that Puppet changes the
file's contents.
Applying the manifest again with puppet apply c:\myfiles\file.pp results in no changes to the system, demonstrating
that Puppet behaves idempotently.
Many of the samples in Puppet documentation
assume that you have this basic understanding of creating and editing manifest files, and
applying them with puppet apply.
Additional command line tools
Once you understand how to write manifests, validate them,
and use puppet apply to enforce your
changes, you're ready to use commands such as puppet
agent, puppet resource, and
puppet module
install.
puppet
            agent
Like puppet
apply, the puppet
agent command line tool applies configuration changes to a system.
However, puppet agent retrieves
compiled catalogs from a Puppet Server, and applies them to
the local system. Puppet is installed as a Windows service, and by default tries to contact the
master every 30 minutes by running puppet
agent to retrieve new catalogs and apply them locally.
puppet resource
puppet
resource to query the state of a particular type of resource on the
system. For example, to list all of the users on a system, run the command puppet resource user. 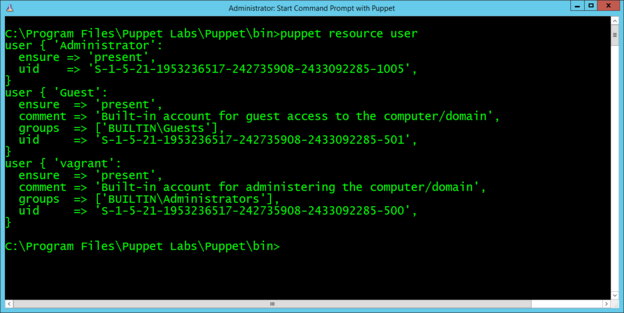
The computer used for this example has three local user accounts: Administrator, Guest, and vagrant. Note that the output is the same format as a manifest, and you can copy and paste it directly into a manifest.
puppet module
        install
Puppet includes many core resource types, plus you can extend Puppet by installing modules. Modules contain additional resource definitions and the code necessary to modify a system to create, read, modify, or delete those resources. The Puppet Forge contains modules developed by Puppet and community members available for anyone to use.
Puppet synchronizes modules from a master to agent
nodes during puppet agent runs.
Alternatively, you can use the standalone Puppet
module tool, included when you install Puppet, to
manage, view, and test modules.
Run puppet module list to show the list of modules
installed on the system.
To install modules, the Puppet module tool uses the syntax puppet module install NAMESPACE/MODULENAME. The
NAMESPACE is registered to a
module, and MODULE refers to the
specific module name. A very common module to install on Windows is registry, under the puppetlabs namespace. So, to install the registry module, run puppet module install puppetlabs/registry.
Manage Windows services
You can use Puppet to manage Windows services, specifically, to start, stop, enable, disable, list, query, and configure services. This way, you can ensure that certain services are always running or are disabled as necessary.
You write Puppet code to manage services in the manifest. When you apply the manifest, the changes you make to the service are applied.
puppet resource command, which emits code as well as
applying changes.Ensure a Windows service is running
There are often services that you always want running in your infrastructure.
service { '<service name>':
       ensure => 'running'
    }
Example
service { 'w32time':
  ensure => 'running'
}
Stop a Windows service
Some services can impair performance, or might need to be stopped for regular maintenance.
service { '<service name>':
   ensure => 'stopped',
   enable => 'false'
}
Example
service { 'defragsvc':
ensure => 'stopped',
enable => 'false'
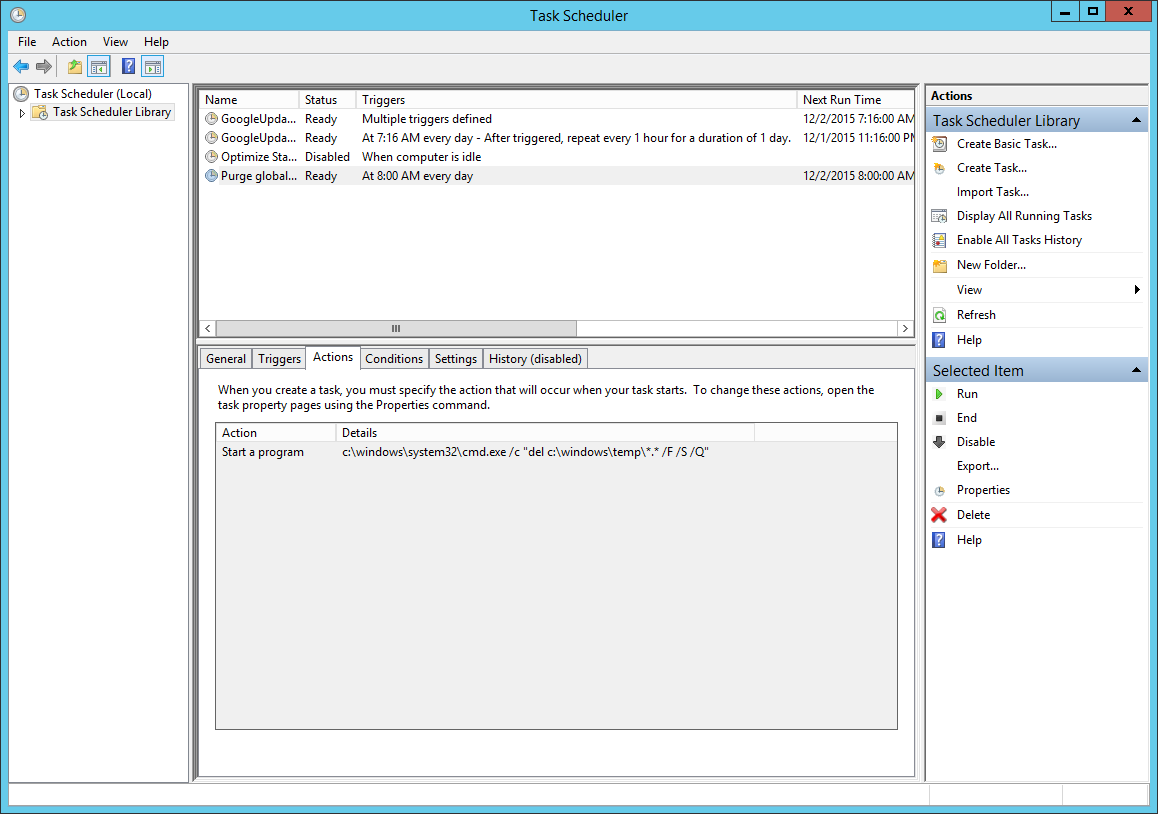
}Schedule a recurring task
Regularly scheduled tasks are often necessary on Windows to perform routine system maintenance.
If you need to sync files from another system on the network, perform backups to another disk, or execute log or index maintenance on SQL Server, you can use Puppet to schedule and perform regular tasks. The following shows how to regularly delete files.
C:\Windows\Temp at 8 AM each day, create a
resource called scheduled_task with
these attributes:
scheduled_task { 'Purge global temp files':
   ensure    => present,
   enabled   => true,
   command   => 'c:\\windows\\system32\\cmd.exe',
   arguments => '/c "del c:\\windows\\temp\\*.* /F /S /Q"',
   trigger   => {
      schedule   => daily,
      start_time => '08:00',
  }
}
Example
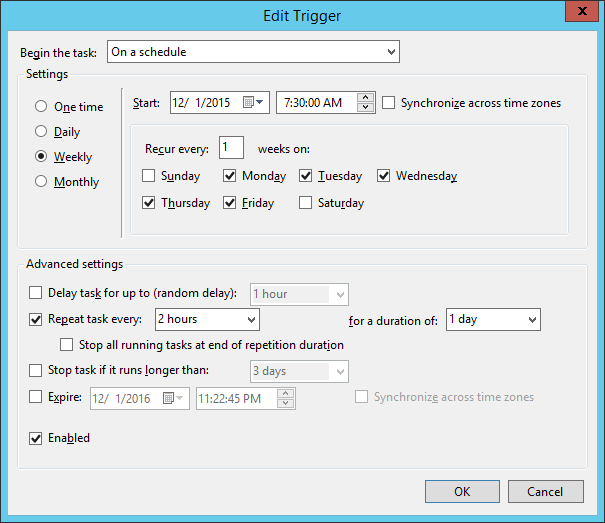
In addition to creating a trivial daily task at a specified time, the scheduled task resource supports a number of other more advanced scheduling capabilities, including more fine-tuned scheduling. For example, to change the above task to instead perform a disk clean-up every 2 hours, modify the trigger definition:
scheduled_task { 'Purge global temp files every 2 hours':
   ensure  => present,
   enabled => true,
   command   => 'c:\\windows\\system32\\cmd.exe',
   arguments => '/c "del c:\\windows\\temp\\*.* /F /S /Q"',
   trigger => [{
      day_of_week => ['mon', 'tues', 'wed', 'thurs', 'fri'],
      every => '1',
      minutes_interval => '120',
      minutes_duration => '1440',
      schedule => 'weekly',
      start_time => '07:30'
   }],
  user => 'system',
}
Manage Windows users and groups
Puppet can be used to create local group and user accounts. Local user accounts are often desirable for isolating applications requiring unique permissions.
Manage administrator accounts
It is often necessary to standardize the local Windows Administrator password across an entire Windows deployment.
'Administrator' as the resource title like
so:
user { 'Administrator':
   ensure => present,
   password => 'yabbadabba'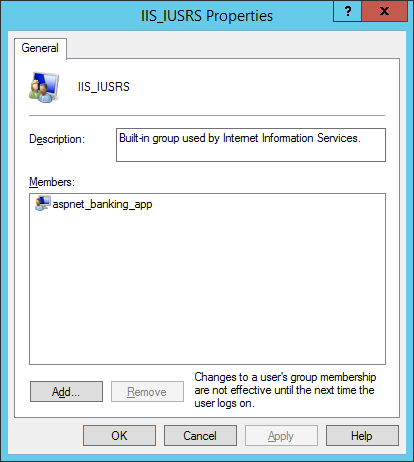
}Configure an app to use a different account
You might not always want to use the default user for an application, you can use Puppet to create users for other applications, like ASP.NET.
Network Service, create
a user and exec resource:
user { 'aspnet_banking_app':
   ensure          => present,
   managehome      => true,
   comment         => 'ASP.NET Service account for Banking application',
   password        => 'banking_app_password',
   groups          => ['IIS_IUSRS', 'Users'],
   auth_membership => 'minimum',
   notify          => Exec['regiis_aspnet_banking_app']
}

exec { 'regiis_aspnet_banking_app':
   path        => 'c:\\windows\\Microsoft.NET\\Framework\\v4.0.30319',
   command     => 'aspnet_regiis.exe -ga aspnet_banking_app',
   refreshonly => true
}In this example, the user is created in the appropriate groups, and the ASP.NET IIS registration command is run after the user is created to ensure file permissions are correct.
In the user resource, there are a few important details to note:
managehomeis set to create the user's home directory on disk.auth_membershipis set to minimum, meaning that Puppet makes sure theaspnet_banking_appuser is a part of theIIS_IUSRSandUsersgroup, but doesn't remove the user from any other groups it might be a part of.notifyis set on the user, andrefreshonlyis set on theexec. This tells Puppet to runaspnet_regiis.exeonly when theaspnet_banking_appis created or changed.
Manage local groups
Local user accounts are often desirable for isolating applications requiring unique permissions. It can also be useful to manipulate existing local groups.
group { 'Administrators':
   ensure  => 'present',
   members => ['DOMAIN\\User'],
   auth_membership => false
}In this case, auth_membership is set to false to ensure that DOMAIN\User is present in the Administrators group, but that
other accounts that might be present in Administrators are not removed.
Note that the groups
attribute of user and the members attribute of group might both accept SID values, like the
well-known SID for Administrators, S-1-5-32-544.
Executing PowerShell code
Some Windows maintenance tasks require the use of Windows Management Instrumentation (WMI), and PowerShell is the most useful way to access WMI methods. Puppet has a special module that can be used to execute arbitrary PowerShell code.
A common Windows maintenance tasks is to disable Windows drive indexing, because it can negatively impact disk performance on servers.
$drive = 'C:'

exec { 'disable-c-indexing':
   provider  => powershell,
   command   => "\$wmi_volume = Get-WmiObject -Class Win32_Volume -Filter 'DriveLetter=\"${drive}\"'; if (\$wmi_volume.IndexingEnabled -ne \$True) { return }; \$wmi_volume | Set-WmiInstance -Arguments @{IndexingEnabled = \$False}",
   unless    => "if ((Get-WmiObject -Class Win32_Volume -Filter 'DriveLetter=\"${drive}\"').IndexingEnabled) { exit 1 }",
}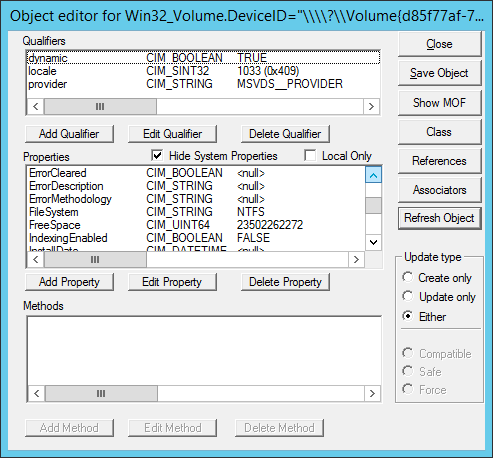
Using the Windows built-in
WBEMTest tool, running this manifest sets IndexingEnabled to FALSE,
which is the desired behavior.
exec sets a few important attributes: The provider is configured to use PowerShell (which relies on the module).
The command contains inline PowerShell, and as such, must be escaped with PowerShell variables preceded with
$must be escaped as\$.The
unlessattribute is set to ensure that Puppet behaves idempotently, a key aspect of using Puppet to manage resources. If the resource is already in the desired state, Puppet does not modify the resource state.
Using templates to better manage Puppet code
While inline PowerShell is usable as an exec
resource in your manifest, such code can be difficult to read and maintain, especially when it
comes to handling escaping rules.
For executing multi-line scripts, use Puppet templates instead. The following example shows how you can use a template to organize the code for disabling Windows drive indexing.
$drive = 'C:'

exec { 'disable-c-indexing':
  command   => template('Disable-Indexing.ps1.erb'),
  provider  => powershell,
  unless    => "if ((Get-WmiObject -Class Win32_Volume -Filter 'DriveLetter=\"${drive}\"').IndexingEnabled) { exit 1 }",
}
The PowerShell code for Disable-Indexing.ps1.erb becomes:
function Disable-Indexing($Drive)
{
  $drive = Get-WmiObject -Class Win32_Volume -Filter "DriveLetter='$Letter'"
  if ($drive.IndexingEnabled -ne $True) { return }
  $drive | Set-WmiInstance -Arguments @{IndexingEnabled=$False} | Out-Null
}

Disable-Indexing -Drive '<%= @driveLetter %>'