Using the Windows module pack

This guide covers creating a managed permission with ACL, creating managed registry keys and values with registry, and installing and creating your own packages with chocolatey.

Windows module pack

The Windows module pack is a group of modules available on the Forge curated to help you complete common Windows tasks.

The Forge is an online community of Puppet modules submitted by Puppet and community members. The Forge makes it easier for you to manage Puppet and can save you time by using pre-written modules, rather than writing your own. In addition to being rated by the community, modules in the Forge can be Puppet Approved or Puppet Supported. The major difference is that Approved modules are not available for Puppet Enterprise support services, but are still tested and adhere to a standard for style and quality.

The Windows module pack includes several Windows compatible modules that help you complete common specific tasks. You can find more Windows modules by searching the Forge. While the module pack itself is not supported, the modules by Puppet contained in the pack are individually supported with PE. The rest have been reviewed and recommended by Puppet but are not eligible for commercial support.

The Windows module pack enables you to do the following:

  • Read, create, and write registry keys with registry.
  • Interact with PowerShell through the Puppet DSL with powershell.
  • Manage Windows PowerShell DSC (Desired State Configuration) resources using dsc and dsc_lite.
  • Reboot Windows as part of management as necessary through reboot.
  • Enforce fine-grained access control permissions using acl.
  • Manage Windows Server Update Service configs on client nodes wsus_client.
  • Install or remove Windows features with windowsfeature.
  • Download files for use during management via download_file.
  • Build IIS sites and virtual applications with iis.
  • Install packages with chocolatey.
  • Manage environment variables with windows_env.

Install the Windows module pack

These steps show you how to install the module pack locally, but you can also install it on the master and pluginsync pushes the module pack to all of your nodes.

  1. Open the Puppet command prompt. If you haven't opened the command line interface before, enter Command Prompt Puppet in your Start Menu, and click Start Command Prompt with Puppet.
  2. To list modules that you currently have installed, enter puppet module list in your Command Prompt window. If you're just getting started, you likely have no modules installed yet.
  3. Next, to install the puppetlabs/windows module pack, type puppet module install puppetlabs/windows.
    Notice that you get a nice output of everything that’s installed.
    C:\>puppet module install puppetlabs/windows
    Notice: Preparing to install into
    C:/ProgramData/PuppetLabs/code/environments/production/modules ...
    Notice: Downloading from https://forgeapi.puppetlabs.com ...
    Notice: Installing -- do not interrupt ...
    C:/ProgramData/PuppetLabs/code/environments/production/modules
    └─┬ puppetlabs-windows (v2.1.0)
    ├─┬ chocolatey-chocolatey (v1.2.0)
    │ └── badgerious-windows_env (v2.2.2)
    ├── puppet-download_file (v1.2.1)
    ├── puppet-iis (v1.4.1)
    ├── puppet-windowsfeature (v1.1.0)
    ├── puppetlabs-acl (v1.1.1)
    ├── puppetlabs-powershell (v1.0.5)
    ├── puppetlabs-reboot (v1.2.0)
    ├─┬ puppetlabs-registry (v1.1.2)
    │ └── puppetlabs-stdlib (v4.9.0)
    └── puppetlabs-wsus_client (v1.0.0)
Result:

Manage permissions with acl

The puppetlabs-acl module helps you manage access control lists (ACLs), which provide a way to interact with permissions for the Windows file system. This module enables you to set basic permissions up to very advanced permissions using SIDs (Security Identifiers) with an access mask, inheritance, and propagation strategies. First, start with querying some existing permissions.

View file permissions with ACL

ACL is a custom type and provider, so you can use puppet resource to look at existing file and folder permissions.

For some types, you can use the command puppet resource <TYPE NAME> to get all instances of that type. However, there could be thousands of ACLs on a Windows system, so it's best to specify the folder you want to review the types in. Here, check c:\Users to see what permissions it contains.

In the command prompt, enter puppet resource acl c:\Users
acl { 'c:\Users':
  inherit_parent_permissions => 'false',
  permissions                => [
   {identity => 'SYSTEM', rights=> ['full']},
   {identity => 'Administrators', rights => ['full']},
   {identity => 'Users', rights => ['read', 'execute'], affects => 'self_only'},
   {identity => 'Users', rights => ['read', 'execute'], affects => 'children_only'},
   {identity => 'Everyone', rights => ['read', 'execute'], affects => 'self_only'},
   {identity => 'Everyone', rights => ['read', 'execute'], affects => 'children_only'}
  ],
}
Result:

As you can see, this particular folder does not inherit permissions from its parent folder; instead, it sets its own permissions and determines how child files and folders inherit the permissions set here.

  • {'identity' => 'SYSTEM', 'rights'=> ['full']} states that the “SYSTEM” user has full rights to this folder, and by default all children and grandchildren files and folders (as these are the same defaults when creating permissions in Windows).

  • {'identity' => 'Users', 'rights' => ['read', 'execute'], 'affects' => 'self_only'} gives read and execute permissions to Users but only on the current directory.

  • {'identity' => 'Everyone', 'rights' => ['read', 'execute'], 'affects' => 'children_only'} gives read and execute permissions to everyone, but only on subfolders and files.

Note: You might see what appears to be the same permission for a user/group twice (both "Users" and "Everyone" above), where one affects only the folder itself and the other is about children only. They are in fact different permissions.

Create a Puppet managed permission

  1. Run this code to create your first Puppet managed permission. Then, save it as perms.pp
    file{'c:/tempperms':
     ensure => directory,
    }
    
    # By default, the acl creates an implicit relationship to any
    # file resources it finds that match the location.
    acl {'c:/tempperms':
     permissions => [
       {identity => 'Administrators', rights => ['full']},
       {identity => 'Users', rights => ['read','execute']}
     ],
    }
  2. To validate your manifest, in the command prompt, run puppet parser validate c:\<FILE PATH>\perms.pp. If the parser returns nothing, it means validation passed.
  3. To apply the manifest, type puppet apply c:\<FILE PATH>\perms.pp

    Your output should look similar to:

    Notice: Compiled catalog for win2012r2x64 in environment production in 0.12 seconds
    Notice: /Stage[main]/Main/File[c:/tempperms]/ensure: created
    Notice: /Stage[main]/Main/Acl[c:/tempperms]/permissions: permissions changed [
    ] to [
     { identity => 'BUILTIN\Administrators', rights => ["full"] },
     { identity => 'BUILTIN\Users', rights => ["read", "execute"] }
    ]
    Notice: Applied catalog in 0.05 seconds
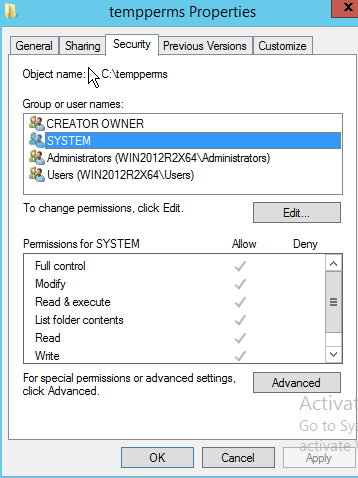
  4. Review the permissions in your Windows UI. In Windows Explorer, right-click tempperms and click Properties. Then, click the Security tab. It should appear similar to the image below.

    The tempperms window with the security tab highlighted.
  5. Optional: It might appear that you have more permissions than you were hoping for here. This is because by default Windows inherits parent permissions. In this case, you might not want to do that. Adjust the acl resource to not inherit parent permissions by changing the perms.pp file to look like the below by adding inherit_parent_permissions => false.
    acl {'c:/tempperms':
      inherit_parent_permissions => false,
      permissions                => [
        {identity => 'Administrators', rights => ['full']},
        {identity => 'Users', rights => ['read','execute']}
      ],
    }
  6. Save the file, and return the command prompt to run puppet parser validate c:\<FILE PATH>\perms.pp again.
  7. When it validates, run puppet apply c:\<FILE PATH>\perms.pp

    You should get output similar to the following:

    C:\>puppet apply c:\puppet_code\perms.pp
    Notice: Compiled catalog for win2012r2x64 in environment production in 0.08 seconds
    Notice: /Stage[main]/Main/Acl[c:/tempperms]/inherit_parent_permissions: inherit_
    parent_permissions changed 'true' to 'false'
    Notice: Applied catalog in 0.02 seconds
  8. To check the permissions again, enter icacls c:\tempperms in the command prompt. The command, icacls, is specifically for displaying and modifying ACLs. The output should be similar to the following:
    C:\>icacls c:\tempperms
    c:\tempperms BUILTIN\Administrators:(OI)(CI)(F)
                 BUILTIN\Users:(OI)(CI)(RX)
                 NT AUTHORITY\SYSTEM:(OI)(CI)(F)
                 BUILTIN\Users:(CI)(AD)
                 CREATOR OWNER:(OI)(CI)(IO)(F)
    Successfully processed 1 files; Failed processing 0 files
    The output shows each permission, followed by a list of specific rights in parentheses. This output shows there are more permissions than you specified in perms.pp. Puppet manages permissions next to unmanaged or existing permissions. In the case of removing inheritance, by default Windows copies those existing inherited permissions (or Access Control Entries, ACEs) over to the existing ACL so you have some more permissions that you might not want.
  9. Remove the extra permissions, so that only the permissions you’ve specified are on the folder. To do this, in your perms.pp set purge => true as follows:
    acl {'c:/tempperms':
      inherit_parent_permissions => false,
      purge                      => true,
      permissions                => [
        {identity => 'Administrators', rights => ['full']},
        {identity => 'Users', rights => ['read','execute']}
      ],
    }
  10. Run the parser command as you have before. If it still returns no errors, then you can apply the change.
  11. To apply the change, run puppet apply c:\<FILE PATH>\perms.pp. The output should be similar to below:
    C:\>puppet apply c:\puppet_code\perms.pp
    Notice: Compiled catalog for win2012r2x64 in environment production in 0.08 seco
    nds
    Notice: /Stage[main]/Main/Acl[c:/tempperms]/permissions: permissions changed [
    { identity => 'BUILTIN\Administrators', rights => ["full"] },
    { identity => 'BUILTIN\Users', rights => ["read", "execute"] },
    { identity => 'NT AUTHORITY\SYSTEM', rights => ["full"] },
    { identity => 'BUILTIN\Users', rights => ["mask_specific"], mask => '4', child_types => 'containers' },
    { identity => 'CREATOR OWNER', rights => ["full"], affects => 'children_only' }
    ] to [
    { identity => 'BUILTIN\Administrators', rights => ["full"] },
    { identity => 'BUILTIN\Users', rights => ["read", "execute"] }
    ]
    Notice: Applied catalog in 0.05 seconds
    Puppet outputs a notice as it is removing each of the permissions.
  12. Take a look at the output of icacls again with icacls c:\tempperms
    c:\>icacls c:\tempperms
    c:\tempperms BUILTIN\Administrators:(OI)(CI)(F)
                BUILTIN\Users:(OI)(CI)(RX)
    Successfully processed 1 files; Failed processing 0 files
Result:

Now the permissions have been set up for this directory. You can get into more advanced permission scenarios if you read the usage scenarios on this module’s Forge page.

Create Puppet managed registry keys with registry

You might eventually need to use the registry to access and set highly available settings, among other things. The puppetlabs-registry module, which is also a Puppet Supported Module enables you to set both registry keys and values.

View registry keys and values with puppet resource

puppetlabs-registry is a custom type and provider, so you can use puppet resource to look at existing registry settings.

It is also somewhat limited, like the acl module in that it is restricted to only what is specified.

  1. In your command prompt, run: puppet resource registry_key 'HKLM\Software\Microsoft\Windows'

    Screenshot of the command with a result showing that the specified registry key is present.

    Not that interesting, but now take a look at a registry value.

  2. Enter puppet resource registry_value 'HKLM\SYSTEM\CurrentControlSet\Services\BITS\DisplayName'
    registry_value { 'HKLM\SYSTEM\CurrentControlSet\Services\BITS\DisplayName':
      ensure => 'present',
      data   => ['Background Intelligent Transfer Service'],
      type   => 'string',
    }
    That’s a bit more interesting than a registry key.
Result:

Keys are like file paths (directories) and values are like files that can have data and be of different types.

Create managed keys

Learn how to make managed registry keys, and see Puppet correct configuration drift when you try and alter them in Registry Editor.

  1. Create your first Puppet managed registry keys and values:
    registry_key { 'HKLM\Software\zTemporaryPuppet':
         ensure => present,
    }
    
    # By default the registry creates an implicit relationship to any file
    # resources it finds that match the location.
    registry_value {'HKLM\Software\zTemporaryPuppet\StringValue':
      ensure => 'present',
      data   => 'This is a custom value.',
      type   => 'string',
    }
    
    #forcing a 32-bit registry view; watch where this is created:
    registry_key { '32:HKLM\Software\zTemporaryPuppet':
      ensure => present,
    }
    
    registry_value {'32:HKLM\Software\zTemporaryPuppet\StringValue':
      ensure => 'present',
      data   => 'This is a custom 32-bit value.',
      type   => 'expand',
    }
  2. Save the file as registry.pp.
  3. Validate the manifest. In the command prompt, run puppet parser validate c:\<FILE PATH>\registry.pp

    If the parser returns nothing, it means validation passed.

  4. Now, apply the manifest by running puppet apply c:\<FILE PATH>\registry.pp in the command prompt. Your output should look similar to below.
    Notice: Compiled catalog for win2012r2x64 in environment production in 0.11 seco
    nds
    Notice: /Stage[main]/Main/Registry_key[HKLM\Software\zTemporaryPuppet]/ensure: c
    reated
    Notice: /Stage[main]/Main/Registry_value[HKLM\Software\zTemporaryPuppet\StringVa
    lue]/ensure: created
    Notice: /Stage[main]/Main/Registry_key[32:HKLM\Software\zTemporaryPuppet]/ensure
    : created
    Notice: /Stage[main]/Main/Registry_value[32:HKLM\Software\zTemporaryPuppet\Strin
    gValue]/ensure: created
    Notice: Applied catalog in 0.03 seconds
  5. Next, inspect the registry and see what you have. Press Start + R, then type regedit and press Enter. Once the Registry Editor opens, find your keys under HKEY_LOCAL_MACHINE.

    The Registry Editor window showing keys in the zTemporaryPuppet subfolder.
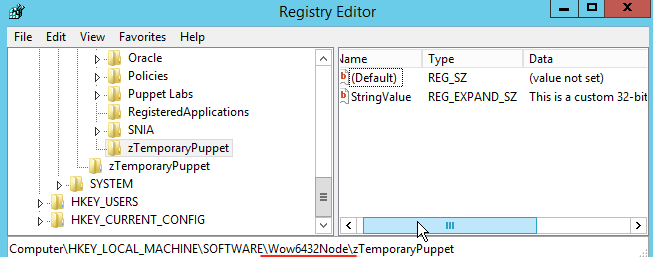
    Note that the 32-bit keys were created under the 32-bit section of Wow6432Node for Software.
  6. Apply the manifest again by running puppet apply c:\<FILE PATH>\registry.pp
    Notice: Compiled catalog for win2012r2x64 in environment production in 0.11 seconds
    Notice: Applied catalog in 0.02 seconds

    Nothing changed, so there is no work for Puppet to do.

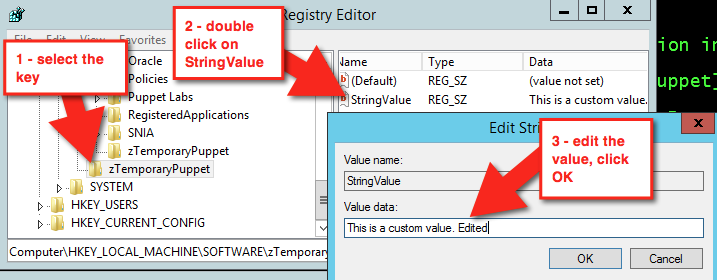
  7. In Registry Editor, change the data. Select HKLM\Software\zTemporaryPuppet and in the right box, double-click StringValue. Edit the value data, and click OK.

    A screenshot of the Registry Editor with pointers showing where to select the key, double click on the StringValue, and edit the value data for that StringValue.
    This time, changes have been made, so running puppet apply c:\path\to\registry.pp results in a different output.
    Notice: Compiled catalog for win2012r2x64 in environment production
    in 0.11 seconds
    Notice: /Stage[main]/Main/Registry_value[HKLM\Software\zTemporaryPuppet\StringValue]/data:
    data changed 'This is a custom value. Edited' to 'This is a custom value.'
    Notice: Applied catalog in 0.03 seconds

    Puppet automatically corrects the configuration drift.

  8. Next, clean up and remove the keys and values. Make your registry.pp file look like the below:
    registry_key { 'HKLM\Software\zTemporaryPuppet':
      ensure => absent,
    }
    
    #forcing a 32 bit registry view, watch where this is created
    registry_key { '32:HKLM\Software\zTemporaryPuppet':
      ensure => absent,
    }
  9. Validate it with puppet parser validate c:\path\to\registry.pp and apply it again with puppet apply c:\path\to\registry.pp
    Notice: Compiled catalog for win2012r2x64 in environment production in 0.06 seconds
    Notice: /Stage[main]/Main/Registry_key[HKLM\Software\zTemporaryPuppet]/ensure: removed
    Notice: /Stage[main]/Main/Registry_key[32:HKLM\Software\zTemporaryPuppet]/ensure
    : removed
    Notice: Applied catalog in 0.02 seconds
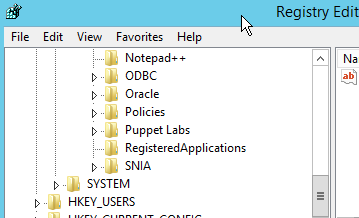
    Refresh the view in your Registry Editor. The values are gone.

    Screenshot of the Registry Editor showing that the adjusted value is gone.

Example

Here’s a real world example that disables error reporting:
class puppetconf::disable_error_reporting {
  registry_value { 'HKEY_LOCAL_MACHINE\SOFTWARE\Microsoft\Windows\Windows Error Reporting\ForceQueue':
    type => dword,
    data => '1',
  }

  registry_value { 'HKEY_LOCAL_MACHINE\SOFTWARE\Microsoft\Windows\Windows Error Reporting\DontShowUI':
    type => dword,
    data => '1',
  }

  registry_value { 'HKEY_LOCAL_MACHINE\SOFTWARE\Microsoft\Windows\Windows Error Reporting\DontSendAdditionalData':
    type => dword,
    data => '1',
  }

  registry_key { 'HKEY_LOCAL_MACHINE\SOFTWARE\Microsoft\Windows\Windows Error Reporting\Consent':
    ensure       => present,
  }

  registry_value { 'HKEY_LOCAL_MACHINE\SOFTWARE\Microsoft\Windows\Windows Error Reporting\Consent\DefaultConsent':
   type => dword,
   data => '2',
  }
}

Create, install and repackage packages with the chocolatey module

Chocolatey is a package manager for Windows that is similar in design and execution to package managers on non-Windows systems. The chocolatey module is a Puppet Approved Module, so it's not eligible for Puppet Enterprise support services. The module has the capability to intall and configure Chocolatey itself, and then manage software on Windows with Chocolatey packages.

View existing packages

Chocolatey has a custom provider for the package resource type, so you can use puppet resource to view existing packages.

In the command prompt, run puppet resource package --param provider | more

The additional provider parameter in this command outputs all types of installed packages that are detected by multiple providers.

Install Chocolatey

These steps are to install Chocolatey (choco.exe) itself. You use the module to ensure Chocolatey is installed.

  1. Create a new manifest in the chocolatey module called chocolatey.pp with the following contents:
    include chocolatey
  2. Validate the manifest by running puppet parser validate c:\<FILE PATH>\chocolatey.pp in the command prompt. If the parser returns nothing, it means validation passed.
  3. Apply the manifest by running puppet apply c:\<FILE PATH>\chocolatey.pp

    Your output should look similar to below:

    Notice: Compiled catalog for win2012r2x64 in environment production in 0.58 seconds
    Notice: /Stage[main]/Chocolatey::Install/Windows_env[chocolatey_PATH_env]/ensure
    : created
    Notice: /Stage[main]/Chocolatey::Install/Windows_env[chocolatey_ChocolateyInstal
    l_env]/ensure: created
    Notice: /Stage[main]/Chocolatey::Install/Exec[install_chocolatey_official]/retur
    ns: executed successfully
    Notice: /Stage[main]/Chocolatey::Install/Exec[install_chocolatey_official]: Trig
    gered 'refresh' from 2 events
    Notice: Finished catalog run in 13.22 seconds

    In a production scenario, you’re likely to have a Chocolatey.nupkg file somewhere internal. In cases like that, you can use the internal nupkg for Chocolatey installation:

    class {'chocolatey':
      chocolatey_download_url => 'https://internalurl/to/chocolatey.nupkg',
      use_7zip                => false,
      log_output              => true,
    }

Install a package with chocolatey

Normally, when installing packages you copy them locally first, make any required changes to bring everything they download to an internal location, repackage the package with the edits, and build your own packages to host on your internal package repository (feed). For this exercise, however, you directly install a portable Notepad++ from Chocolatey's community feed. The Notepad++ CommandLine package is portable and shouldn't greatly affect an existing system.

  1. Update the manifest chocolatey.pp with the following contents:
    package {'notepadplusplus.commandline':
      ensure   => installed,
      provider => chocolatey,
    }
  2. Validate the manifest by running puppet parser validate c:\<FILE PATH>\chocolatey.pp in the command prompt. If the parser returns nothing, it means validation passed.
  3. Now, apply the manifest with puppet apply c:\<FILE PATH>\chocolatey.pp. Your output should look similar to below.
    Notice: Compiled catalog for win2012r2x64 in environment production in 0.75 seconds
    Notice: /Stage[main]/Main/Package[notepadplusplus.commandline]/ensure: created
    Notice: Applied catalog in 15.51 seconds
Result:

If you want to use this package for a production scenario, you need an internal custom feed. This is simple to set up with the chocolatey_server module. You could also use Sonatype Nexus, Artifactory, or a CIFS share if you want to host packages with a non-Windows option, or you can use anything on Windows that exposes a NuGet OData feed (Nuget is the packaging infrastructure that Chocolatey uses). See the How To Host Feed page of the chocolatey wiki for more in-depth information. You could also store packages on your master and use a file resource to verify they are in a specific local directory prior to ensuring the packages.

Example

The following example ensures that Chocolatey, the Chocolatey Simple Server (an internal Chocolatey package repository), and some packages are installed. It requires the additional chocolatey/chocolatey_server module.

In c:\<FILE PATH>\packages you must have packages for ChocolateyChocolatey.ServerRoundhousELaunchy, and Git, as well as any of their dependencies for this to work.

case $operatingsystem {
  'windows':    {
    Package {
      provider => chocolatey,
      source   => 'C:\packages',
    }
  }
}

# include chocolatey
class {'chocolatey':
  chocolatey_download_url => 'file:///C:/packages/chocolatey.0.9.9.11.nupkg',
  use_7zip                => false,
  log_output              => true,
}

# This contains the bits to install the custom server.
# include chocolatey_server
class {'chocolatey_server':
  server_package_source => 'C:/packages',
}

package {'roundhouse':
  ensure   => '0.8.5.0',
}


package {'launchy':
  ensure          => installed,
  install_options => ['-override', '-installArgs','"', '/VERYSILENT','/NORESTART','"'],
}

package {'git':
  ensure => latest,
}

Copy an existing package and make it internal (repackaging packages)

To make the existing package local, use these steps.

Chocolatey's community feed has quite a few packages, but they are geared towards community and use the internet for downloading from official distribution sites. However, they are attractive as they have everything necessary to install a piece of software on your machine. Through the repackaging process, by which you take a community package and bring all of the bits internal or embed them into the package, you can completely internalize a package to host on an internal Chocolatey/NuGet repository. This gives you complete control over a package and removes the aforementioned production trust and control issues.

  1. Download the Notepad++ package from Chocolatey's community feed by going to the package page and clicking the download link.
  2. Rename the downloaded file to end with .zip and unpack the file as a regular archive.
  3. Delete the _rels and package folders and the [Content_Types].xml file. These are created during choco pack and should not be included, because they're regenerated (and their existence leads to issues).
    notepadplusplus.commandline.6.8.7.nupkg     
    ├───_rels   # DELETE
    ├───package # DELETE
    │   └───services
    ├───tools
    ├── [Content_Types].xml	# DELETE
    └── notepadplusplus.commandline.nuspec
  4. Open tools\chocolateyInstall.ps1.
    Install-ChocolateyZipPackage 'notepadplusplus.commandline' 'https://notepad-plus-plus.org/repository/6.x/6.8.7/npp.6.8.7.bin.zip' "$(Split-Path -parent $MyInvocation.MyCommand.Definition)"
  5. Download the zip file and place it in the tools folder of the package.
  6. Next, edit chocolateyInstall.ps1 to point to this embedded file instead of reaching out to the internet (if the size of the file is over 50MB, you might want to put it on a file share somewhere internally for better performance).
    $toolsDir   = "$(Split-Path -parent $MyInvocation.MyCommand.Definition)"
    Install-ChocolateyZipPackage 'notepadplusplus.commandline' "$toolsDir\npp.6.8.7.bin.zip" "$toolsDir"

    The double quotes allow for string interpolation (meaning variables get interpreted instead of taken literally).

  7. Next, open the *.nuspec file to view its contents and make any necessary changes.
    <?xml version="1.0"?>
    <package xmlns="http://schemas.microsoft.com/packaging/2010/07/nuspec.xsd">
      <metadata>
        <id>notepadplusplus.commandline</id>
        <version>6.8.7</version>
        <title>Notepad++ (Portable, CommandLine)</title>
        <authors>Don Ho</authors>
        <owners>Rob Reynolds</owners>
        <projectUrl>https://notepad-plus-plus.org/</projectUrl>
        <iconUrl>https://cdn.rawgit.com/ferventcoder/chocolatey-packages/02c21bebe5abb495a56747cbb9b4b5415c933fc0/icons/notepadplusplus.png</iconUrl>
        <requireLicenseAcceptance>false</requireLicenseAcceptance>
        <description>Notepad++ is a ... </description>
        <summary>Notepad++ is a free (as in "free speech" and also as in "free beer") source code editor and Notepad replacement that supports several languages. </summary>
        <tags>notepad notepadplusplus notepad-plus-plus</tags>
      </metadata>
    </package>

    Some organizations change the version field to denote that this is an edited internal package, for example changing 6.8.7 to 6.8.7.20151202. For now, this is not necessary.

  8. Now you can navigate via the command prompt to the folder with the .nuspec file (from a Windows machine unless you’ve installed Mono and built choco.exe from source) and use choco pack. You can also be more specific and run choco pack <FILE PATH>\notepadplusplus.commandline.nuspec. The output should be similar to below.
    Attempting to build package from 'notepadplusplus.commandline.nuspec'.
    Successfully created package 'notepadplusplus.commandline.6.8.7.nupkg'

    Normally you test on a system to ensure that the package you just built is good prior to pushing the package (just the *.nupkg) to your internal repository. This can be done by using choco.exe on a test system to install (choco install notepadplusplus.commandline -source %cd% - change %cd% to $pwd in PowerShell.exe) and uninstall (choco uninstall notepadplusplus.commandline). Another method of testing is to run the manifest pointed to a local source folder, which is what you are going to do.

  9. Create c:\packages and copy the resulting package file (notepadplusplus.commandline.6.8.7.nupkg) into it.
    This won’t actually install on this system since you just installed the same version from Chocolatey’s community feed. So you need to remove the existing package first. To remove it, edit your chocolatey.pp to set the package to absent.
    package {'notepadplusplus.commandline':
      ensure   => absent,
      provider => chocolatey,
    }
  10. Validate the manifest with puppet parser validate path\to\chocolatey.pp. Apply the manifest to ensure the change puppet apply c:\path\to\chocolatey.pp.

    You can validate that the package has been removed by checking for it in the package install location or by using choco list -lo.

  11. Update the manifest (chocolatey.pp) to use the custom package.
    package {'notepadplusplus.commandline':
      ensure   => latest,
     provider => chocolatey,
     source   => 'c:\packages',
    }
  12. Validate the manifest with the parser and then apply it again. You can see Puppet creating the new install in the output.
    Notice: Compiled catalog for win2012r2x64 in environment production in 0.79 seconds
    Notice: /Stage[main]/Main/Package[notepadplusplus.commandline]/ensure: created
    Notice: Applied catalog in 14.78 seconds
  13. In an earlier step, you added a *.zip file to the package, so that you can inspect it and be sure the custom package was installed. Navigate to C:\ProgramData\chocolatey\lib\notepadplusplus.commandline\tools (if you have a default install location for Chocolatey) and see if you can find the *.zip file.

    You can also validate the chocolateyInstall.ps1 by opening and viewing it to see that it is the custom file you changed.

Create a package with chocolatey

Creating your own packages is, for some system administrators, surprisingly simple compared to other packaging standards.

Ensure you have at least Chocolatey CLI (choco.exe) version 0.9.9.11 or newer for this next part.

  1. From the command prompt, enter choco new -h to see a help menu of what the available options are.
  2. Next, use choco new vagrant to create a package named 'vagrant'. The output should be similar to the following:
    Creating a new package specification at C:\temppackages\vagrant
       Generating template to a file
        at 'C:\temppackages\vagrant\vagrant.nuspec'
       Generating template to a file
        at 'C:\temppackages\vagrant\tools\chocolateyinstall.ps1'
       Generating template to a file
        at 'C:\temppackages\vagrant\tools\chocolateyuninstall.ps1'
       Generating template to a file
        at 'C:\temppackages\vagrant\tools\ReadMe.md'
       Successfully generated vagrant package specification files
        at 'C:\temppackages\vagrant'
    
    It comes with some files already templated for you to fill out (you can also create your own custom templates for later use).
  3. Open vagrant.nuspec, and edit it to look like this:
    <?xml version="1.0" encoding="utf-8"?>
    <package xmlns="http://schemas.microsoft.com/packaging/2015/06/nuspec.xsd">
      <metadata>
        <id>vagrant</id>
        <title>Vagrant (Install)</title>
        <version>1.8.4</version>
        <authors>HashiCorp</authors>
        <owners>my company</owners>
        <description>Vagrant - Development environments made easy.</description>
      </metadata>
      <files>
        <file src="tools\**" target="tools" />
      </files>
    </package>
    

    Unless you are sharing with the world, you don’t need most of what is in the nuspec template file, so only required items are included above. Match the version of the package in this nuspec file to the version of the underlying software as closely as possible. In this example, Vagrant 1.8.4 is being packaged. 

  4. Open chocolateyInstall.ps1 and edit it to look like the following:
    $ErrorActionPreference = 'Stop';
    
    $packageName= 'vagrant'
    $toolsDir   = "$(Split-Path -parent $MyInvocation.MyCommand.Definition)"
    $fileLocation = Join-Path $toolsDir 'vagrant_1.8.4.msi'
    
    $packageArgs = @{
      packageName   = $packageName
      fileType      = 'msi'
      file         = $fileLocation
    
      silentArgs    = "/qn /norestart"
      validExitCodes= @(0, 3010, 1641)
    }
    
    Install-ChocolateyInstallPackage @packageArgs
    Note: The above is Install-ChocolateyINSTALLPackage, not to be confused with Install-ChocolateyPackage. The names are very close to each other, however the latter also downloads software from a URI (URL, ftp, file) which is not necessary for this example.
  5. Delete the ReadMe.md and chocolateyUninstall.ps1 files. Download Vagrant and move it to the tools folder of the package.
    Note: Normally if a package is over 100MB, it is recommended to move the software installer/archive to a share drive and point to it instead. For this example, just bundle it as is.
  6. Now pack it up by using choco pack. Copy the new vagrant.1.8.4.nupkg file to c:\packages.
  7. Open the manifest, and add the new package you just created. Your chocolatey.pp file should look like the below.
    package {'vagrant':
      ensure   => installed,
      provider => chocolatey,
      source   => 'c:\packages',
    }
  8. Save the file and make sure to validate with the Puppet parser.
  9. Use puppet apply <FILE PATH>\chocolatey.pp to run the manifest.
  10. Open Control Panel, Programs and Features and take a look.
Result:

A screenshot of the Programs and Features window, with Vagrant listed as an installed program.

Vagrant is installed!

Uninstall packages with Chocolatey

In addition to installing and creating packages, Chocolatey can also help you uninstall them.

To verify that the choco autoUninstaller feature is turned on, use choco feature to list the features and their current state. If you're using include chocolatey or class chocolatey to ensure Chocolatey is installed, the configuration is applied automatically (unless you have explicitly disabled it). Starting in Chocolatey version 0.9.10, it is enabled by default.

  1. If you see autoUninstaller - [Disabled], you need to enable it. To do this, in the command prompt, run choco feature enable -n autoUninstaller You should see a similar success message:

    You should see a similar success message:

    Enabled autoUninstaller
  2. To remove Vagrant, edit your chocolatey.pp manifest to ensure => absent. Then save and validate the file.
    package {'vagrant':
      ensure   => absent,
      provider => chocolatey,
      source   => 'c:\packages',
    }
  3. Next, run puppet apply <FILE PATH>\chocolatey.pp to apply the manifest.
    Notice: Compiled catalog for win2012r2x64 in environment production in 0.75 seconds
    Notice: /Stage[main]/Main/Package[vagrant]/ensure: removed
    Notice: Applied catalog in 40.85 seconds
Result:

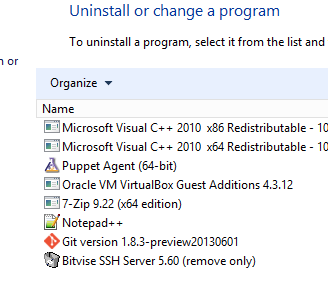
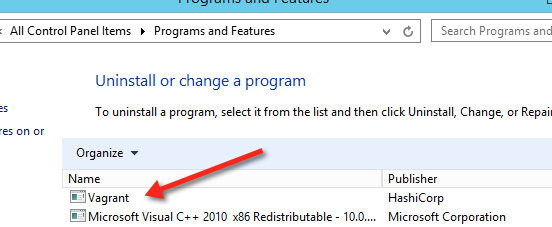
You can look in the Control Panel, Programs and Features to see that it’s no longer installed!


A screenshot of the Programs and Features windows showing that Vagrant is no longer in the list of installed programs.