Using the feature branch workflow

Use the feature branch workflow to safely and efficiently move new code from an isolated development environment, through initial testing and validation, and then into your organization's process for staging, review, and promotion to production. Adapt the steps of this Continuous Delivery for Puppet Enterprise (PE) workflow as needed for your team's requirements and best practices.

Workflow phase 1: Develop and test code changes

The first phase of the feature branch workflow involves writing new code in a feature branch, then testing and validating that code.

Before you begin
Create a regex branch pipeline for the control repo or module repo you’re working on. This pipeline can be as simple or complex as you need it to be, but at minimum it must:
  • Use commits as a pipeline trigger.
  • Contain a deployment that uses the feature branch deployment policy.
  • (Strongly recommended) Include jobs that perform syntax validation tests before the pipeline's deployment stage.
This is an example of a valid regex branch pipeline in the Continuous Delivery for Puppet Enterprise (PE) web UI:
A regex branch pipeline that meets the aforementioned pipeline requirements.
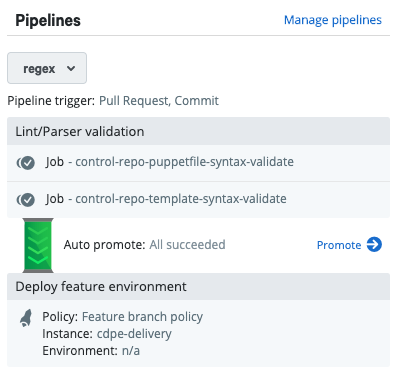
This is the same pipeline formatted as code:
pipelines:
  /feature_.*/:
    triggers:
    - "PULL_REQUEST"
    - "COMMIT"
    stages:
    - name: "Lint/Parser validation"
      steps:
      - type: "JOB"
        name: "control-repo-puppetfile-syntax-validate"
        concurrent_compilations: 0
        all_deployments: false
      - type: "JOB"
        name: "control-repo-template-syntax-validate"
        concurrent_compilations: 0
        all_deployments: false
      auto_promote: "all_succeeded"
    - name: "Deploy feature environment"
      steps:
      - type: "DEPLOYMENT"
        name: "Feature branch deployment on cdpe-delivery"
        policy:
          name: "cd4pe_deployments::feature_branch"
        concurrent_compilations: 0
        all_deployments: false
        pe_server: "cdpe-delivery"
      auto_promote: false
  1. In your source control system, navigate to the control repo or module repo you want to update.
  2. Create a feature branch by create a new branch based on the main branch and naming it feature_<BRANCHNAME>. The <BRANCHNAME> can be a ticket number, fix description, or feature name.
    Important: Continuous Delivery for PE automatically recognizes feature branches by their names. By default, the software uses feature_.* as the regular expression that triggers regex pipelines, so it’s important that your feature branch name has the feature_ prefix.
    Tip: If you need to use a different naming convention for your control/module repo feature branches, you can change the regular expression under Manage pipelines in the Continuous Delivery for PE web UI.
  3. On your feature branch, make your code changes.
  4. When your work is complete, commit the changes to the feature branch and push the commit to your source control system. This commit triggers your regex branch pipeline. You can monitor the pipeline's progress in the Continuous Delivery for PE web UI.

    When your pipeline is triggered, Continuous Delivery for PE runs the jobs and impact analysis tasks you set up. If the pipeline's promotion conditions are met (for example, if all jobs succeed), the pipeline starts a feature branch deployment.

    How does a feature branch deployment work? Using Code Manager, Continuous Delivery for PE deploys your committed code to a Puppetenvironment with the same name as the branch that triggered the pipeline. If an environment with this name doesn't already exist (as is most likely the case), Continuous Delivery for PE creates it.

  5. When the feature branch deployment is complete, run Puppet on a test node, specifying the special environment created by Continuous Delivery for PE. This Puppet run applies your changes to the test node so you can review them. You can run Puppet from the PE console or the command line:
    1. From the PE console, navigate to the Run Puppet page and create a job with the following settings, and click Run job:
      • Job description: Enter a description for your test run.
      • Environment: Select Select an environment for nodes to run in and choose the environment that matches your feature branch name.
      • Schedule: Now.
      • Run Mode: Leave these options unchecked.
      • Inventory: Select Node list and add the name of your test node.
    2. From the command line, run:
      puppet job run --nodes <TEST_NODE_NAME> --environment <feature_BRANCHNAME>
      Tip: Running Puppet on demand from the CLI provides more information on the puppet job run command.
  6. When the Puppet run is complete, navigate to the test node and review the changes. If further work is needed, repeat steps 3 through 5 until your code is ready for deployment to production. When you're satisfied with your new code, move on to Workflow phase 2: Review and merge to production.

Workflow phase 2: Review and merge to production

In the second phase of the feature branch workflow, new code is reviewed, merged into the main branch, and deployed to production. Along the way, Continuous Delivery for Puppet Enterprise (PE) provides checks and safeguards to ensure new code is only sent to production nodes after being fully vetted.

Before you begin
Complete Workflow phase 1: Develop and test code changes and make sure your main branch pipeline:
  • Uses pull requests as a pipeline trigger.
  • Includes a pull request (PR) gate.
  1. In your source control system, create a pull request from your feature_<BRANCHNAME> branch to the main branch.
  2. The pull request triggers your main branch pipeline to test your PR code against the jobs and impact analysis report tasks included in the pipeline up to the PR gate. You can monitor the pipeline's progress in the Continuous Delivery for PE web UI.
    You can also see whether each pipeline stage succeeded or failed on the pull request page in your source control system.
  3. Your team's stakeholders can review the results of the jobs and impact analysis reports generated by the pipeline. If the PR is approved, merge it into the main branch.
    Note: After merging the PR, you can delete the original feature_<BRANCHNAME> branch from your source control system.
    Merging a PR creates a commit to the main branch and automatically re-triggers the main branch pipeline. The pipeline starts over from the top, re-running all the jobs and impact analysis tasks to ensure the newly updated main branch code is fully tested and vetted. However, because a commit triggered this pipeline run, the pipeline proceeds past the PR gate and performs any tasks included in the pipeline after the PR gate, such as additional jobs or deployment to a staging environment.
  4. Once the code is deployed to a staging environment, perform additional testing by running Puppet against test or staging nodes. Make sure to specify the staging environment. The scope of this testing is determined by your team or company best practices.
  5. When testing is complete and the code changes are approved, promote the code to the production environment.

    Usually, the main branch pipeline does not auto-promote code to the production environment. To trigger the final stage, a stakeholder must click Promote on the pipeline page in the Continuous Delivery for PE web UI. This kicks off deployment to the production environment unless the production environment is a protected environment.

    Deployments to protected environments require review and approval from a member of a designated approval group before proceeding. These deployments remain in a pending state until an approval decision is provided. Require approval for deployments to protected Puppet environments explains how to set up approval groups.

  6. If necessary, run Puppet to apply the new code to the nodes in your production environment. Depending on which deployment policy you've used, a Puppet run might be included in the deployment Continuous Delivery for PE performs. Otherwise, you can trigger Puppet manually or wait for the next scheduled Puppet run.
Results
When the Puppet run is complete, your code changes are officially deployed to production.