Docs
![]() Patterns and Tactics
Patterns and Tactics
![]() Patterns and tactics
Patterns and tactics
![]() Server admin guide
Server admin guide
![]() Performance
Performance
![]() Tuning
Tuning
![]() Running multiple plans and code deployments simultaneously
Running multiple plans and code deployments simultaneously
![]()
Running multiple plans and code deployments simultaneously
Sections
- Product and version: Puppet Enterprise 2019.8.7
- Document version: 1.2
- Release date: 26 Oct 2021
Introduction
This tactic will help you to provide an extent of scalability in Orchestrator. We tested this workaround with up to 120 multiple long-running plans and multiple code deployments in between, the results were a success, having zero timeouts due to the lack of available JRubies in Orchestrator.
We will use the taskplan module written by our colleague Reid from the Solutions Architects Team
This module allows you to run Plans directly in the Orchestrator instead of running them in Puppet Enterprise (PE), only the task taskplan will be executed in the PE side, it will run the task (taskplan) in Puppet Bolt® and it will hit the Orchestrator directly. The whole purpose is to avoid the lock mechanism of Orchestrator when there is a code-deployment and upcoming plans.
Steps
Install Bolt on the PE Server
Configure Bolt to run as root, and to use the PCP transport
Install the taskplan module (from your control-repo)
Bring your own plans
Testing the workaround
Install Bolt on the PE Server
In this example, we will use CentOS 7, but you can find more information about your system here
sudo rpm -Uvh https://yum.puppet.com/puppet-tools-release-el-7.noarch.rpm
sudo yum install puppet-boltCopied!
Configure Bolt to run as root, and to use the PCP transport
When invoked, taskplan runs Bolt as root. To avoid needing to pass a lot of arguments every time a user runs taskplan, we need to configure Bolt's defaults for the root user. There are two files we need to create or modify.
bolt-defaults.yaml
First, create /root/.puppetlabs/etc/bolt/bolt-defaults.yaml. This file will configure Bolt to use the orchestrator (pcp) as its default transport.
mkdir -p /root/.puppetlabs/etc/bolt/
touch /root/.puppetlabs/etc/bolt/bolt-defaults.yamlCopied!
Edit the bolt-defaults.yaml file with your favorite text editor and add the below content:
# bolt-defaults.yaml
inventory-config:
  transport: pcp
  pcp:
    cacert: "/etc/puppetlabs/puppet/ssl/certs/ca.pem"
    service-url: https://<puppet-primary-server>:8143
    token-file: "~/.puppetlabs/token"
    task-environment: productionCopied!
Make sure to use your own path and values to configure the cacert, service-url, token-file and task-environment.
Also notice that we are explicitly setting the Bolt transport to be PCP
bolt-project.yaml
Next, create /root/.puppetlabs/bolt/bolt-project.yaml. This file will configure the default Bolt project, and let us define a modulepath to read content from.
mkdir -p /root/.puppetlabs/bolt/
touch /root/.puppetlabs/bolt/bolt-project.yamlCopied!
Edit the bolt-project.yaml file with your favorite text editor and add the below content:
# bolt-project.yaml
modulepath:
  - "/etc/puppetlabs/code/environments/production/site-modules"
  - "/etc/puppetlabs/code/environments/production/modules"Copied!
If needed, modify the modulepath entries to include paths to all modules you want to have available. Note that in this example, it is assumed that for taskplan, Bolt will use modules currently available in the production environment.
Install the taskplan module (from your control-repo)
You can install the taskplan module by adding it to the Puppetfile in your control-repo
mod 'reidmv-taskplan', '0.2.3'Copied!Bring your own plans
Chances are you already have some tasks and plans in your control-repo, but just in case you are starting from scratch with a fresh control-repo
Change the
adhocfolder name (Insidesite-modules/) to something more related to your project or company.Move the plans you want to test to
site-modules/<your-company>/plans/
For example:
# site-modules/solarch/plans/hiplan.pp
plan solarch::hiplan (
  String $message,
) {

  notice("Ran solarch::hiplan, with the message: ${message}")

}Copied!
Deploy your changes to the Puppet Server:
puppet code deploy --all --waitCopied!Testing the workaround
Before testing, make sure you have done the previous steps.
Let's start the test with a simple plan, the solarch::hiplan for example
Login into your PE Console
Go to Orchestration -> Tasks on the left side of the page
Click "Run Tasks"
-
Fill the fields with the following values:
Code environment: staging (if you have one)
Task: taskplan
-
Task parameters:
params:
{"message":"Hello world!"}plan:
solarch::hiplan
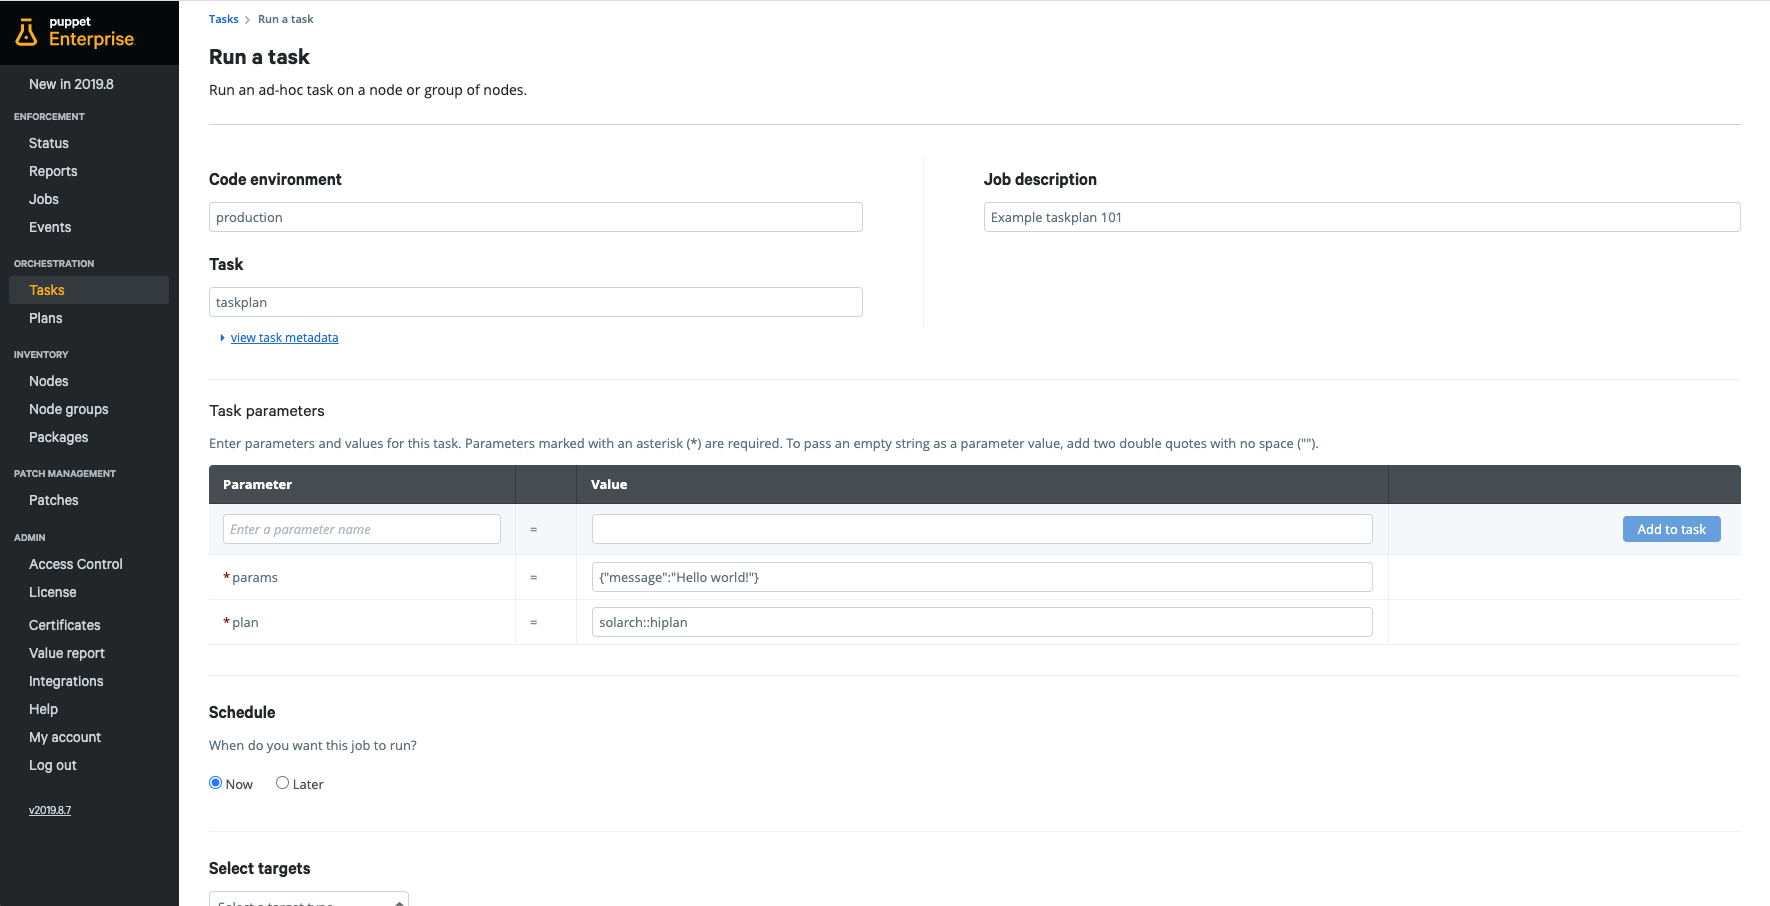
Select your test nodes
Click "Run task"
That's it, you should see your task going from "In progress" to "Succeeded"
Testing from the CLI
Another way to test this approach is by SSH into the PE Server, and running manually:
puppet task run taskplan --nodes <your-node(s)> --params '{"plan":"solarch::hiplan","params":{"message":"Hello World!"}}'Copied!You can follow the execution of the plan from the PE Console as well.
Trade-offs
We know the pros already, which is being able to bypass the lock mechanism of Orchestrator when you have continuous code-deploys and multiple plans running.
The cons you need to be aware though are related to security, there is a potential risk of privilege escalations since the taskplan task runs as root and it can run Bolt.
A recommended approach to migiate the risk is to:
Reduce the scope: Write tailored
taskplans, rather than using the generictaskplan-
Limit who can run it: Set the RBAC properly for users who can run your tailored
taskplans. Do not permit any users to run the generictaskplanNo one should be given RBAC permissions to run the general
taskplanSpecifically, tailored taskplans should not expose the
argumentsparameter oftaskplan, since that's the principal way that running Bolt can be used to escalate privilege.
For writing your tailored taskplans you can take a look at this wrapper example