Integrate with Puppet Enterprise

To set up an integration between your Puppet Enterprise (PE) instance and Continuous Delivery for PE, you must first set up a dedicated PE user with appropriate permissions, then add your PE instance's credentials to Continuous Delivery for PE.

Before you begin
  • You must enable Code Manager on the PE instance before integrating with Continuous Delivery for PE. For instructions, see Configuring Code Manager.
  • The Puppet master certificate must have dns_alt_names configured. To confirm whether your certificate is configured correctly, run:
    openssl x509 -in $(puppet config print hostcert) -text |grep -A 1 "Subject Alternative Name"
    If no output is returned, the master certificate must be regenerated before PE is integrated with Continuous Delivery for PE. For instructions, see Regenerate master certificates in the PE documentation.
Note: For PE instances with a replica configured for disaster recovery. In the event of a partial failover, Continuous Delivery for PE is not available. Learn more at What happens during failovers in the PE documentation. To restore Continuous Delivery for PE functionality, you must promote the replica to primary server.

Create a Continuous Delivery user and user role in PE

Create a "Continuous Delivery" user and user role in PE. This allows you to view a centralized log of the activities Continuous Delivery for PE performs on your behalf. You'll also use this user account when generating the PE authentication token required by the setup process.

  1. To begin, create a new user. In the PE console, click Access control > Users.
  2. Enter a full name (such as Continuous Delivery User) and a login name (such as cdpe_user) and click Add local user.
  3. Next, create a user role containing the permissions the Continuous Delivery User needs when operating Continuous Delivery for PE. In the PE console, click Access control > User roles.
  4. Enter a name and (optional) description for new role, such as CDPE User Role, then click Add role.
  5. Select the user role you've just created from the list on the User roles page.
  6. Click Permissions. Assign the following permissions to the user role:
    Type Permission Object
    Job orchestrator Start, stop, and view jobs -
    Node groups Create, edit, and delete child groups All
    Node groups View All
    Node groups Edit configuration data All
    Node groups Set environment All
    Nodes View node data from PuppetDB -
    Puppet agent Run Puppet on agent nodes -
    Puppet environment Deploy code All
    Puppet Server Compile catalogs for remote nodes -
    Tasks Run tasks At a minimum, cd4pe_jobs::run_cd4pe_job, which is required when running job hardware using a Puppet agent.
  7. Once all the permissions have been added, click Commit changes.
  8. Add your Continuous Delivery user to the user role. Click Member users. Select the name of the user you created earlier, and click Add user, then commit your change.
  9. Your user is now set up and has been given the permissions needed to operate Continuous Delivery for PE. Before proceeding, create a password for the Continuous Delivery user.
    1. Return to the Users page.
    2. Find and click the full name of your newly created user, then click Generate password reset.
    3. Follow the link created and create a password for the user. You'll use this password when adding your PE credentials to Continuous Delivery for PE.

Add your Puppet Enterprise credentials

Establishing an integration with your Puppet Enterprise (PE) instance allows Continuous Delivery for PE to work with PE tools such as Code Manager and the orchestrator service to deploy Puppet code changes to your nodes.

If necessary, you can add multiple PE instances to your Continuous Delivery for PE installation.
Important: Do not perform these steps while signed in as the root user. Sign into Continuous Delivery for PE with your individual user account before proceeding.
  1. In the Continuous Delivery for PE web UI, click Settings.
  2. Click Puppet Enterprise. Click + Add new credentials.
  3. In the New Puppet Enterprise credentials pane, enter a unique friendly name for your Puppet Enterprise installation.

    If you need to work with multiple PE installations within Continuous Delivery for PE, these friendly names help you to differentiate which installation's resources you're managing, so choose them carefully.

  4. Enter the fully qualified domain name (FQDN) you use to access the PE console (such as sample.pe.instance). The FQDN must match the certname of your PE master or an alias included in the dns_alt_names entry in your puppet.conf file.
  5. Select Basic authorization or API token and enter the required information:
    • For Basic authorization, enter the username and password for your "Continuous Delivery" user. Continuous Delivery for PE uses this information to generate an API token for you. The username and password are not saved. Optionally, change the token's lifetime by clicking Change.

    • For API token, generate a PE access token for your "Continuous Delivery" user using puppet-access or the RBAC v1 API, and paste it into the API token field.

      For instructions on generating an access token, see Token-based authentication.

      Tip: To avoid unintended service interruptions, create an access token with a multi-year lifespan.
  6. Click Save changes.
    Continuous Delivery for PE uses the information you provide to look up the endpoints for PuppetDB, Code Manager, orchestrator, and node classifier, and to access the master SSL certificate generated during PE installation. Once your credentials are successfully added, click Edit credentials to view this information.
Results

Your PE instance is now integrated with Continuous Delivery for PE.

To enable impact analysis for this instance, see Configure impact analysis.

Create environment node groups

In order for code deployments managed by Continuous Delivery for PE to work correctly, your environment node groups should be set up in a specific hierarchy.

Continuous Delivery for PE deploys changes to environment node groups. By setting up environment node groups, you define the groups of nodes that you can choose to deploy changes to.

  1. In the PE console, click Classification.
  2. If your node classification does not already include an All Environments node group, create one.
    Note: The All Environments node group is added automatically in new installations of PE version 2018.1.5 and newer. If you're running an older version or have upgraded your PE instance, you must create this node group yourself.
    Click Add group... and create a new node group with the following specifications:
    • Parent name: All Nodes

    • Group name: All Environments

    • Environment: production

    • Environment group: yes

    • Description: Environment group parent and default

  3. Open the All Environments node group and add a new rule:
    • Fact: name

    • Operator: ~

    • Value: .*

  4. Edit the Agent-specified environment node group so that All Environments is its parent. This group should have no rules, and won't match any nodes.
  5. Edit the Production environment node group so that All Environments is its parent. If necessary, modify its rules so that it matches only the correct nodes.
  6. For each of your environment groups (such as testing, staging, and production), create an environment node group.
    1. Create a Git branch to represent the environment.
    2. Run puppet code deploy <ENVIRONMENT_NAME>.
    3. Create a new environment node group with the following specifications:
      • Parent name: All Environments

      • Group name: <ENVIRONMENT_NAME>

      • Environment: <ENVIRONMENT>

      • Environment group: Yes

    4. Associate the relevant nodes with the environment group by creating rules or pinning nodes.

      Best practices for associating nodes with environment node groups:

      • Use the pp_environment trusted fact, or a similar custom fact, to define which environment each node belongs to. Write a rule in each environment group that uses pp_environment or your custom fact to match nodes.

      • See if other facts or trusted facts can be used to create rules that match nodes to one and only one environment group

      • If trusted facts, custom facts, or other facts cannot be used to determine node environments, use pinning. Pin each node to only one environment group.

    5. Specify the Git branch corresponding to the environment.
  7. Optional: For each of your newly created environment groups, create a child environment group. Nodes from the parent environment group are allowed to drop into this exception group to test code from Git feature branches. Give each child environment group the following specifications:
    • Parent name: All <ENVIRONMENT>

    • Group name: <ENVIRONMENT> one-time run exception

    • Environment: Agent-specified

    • Environment group: Yes

    • Description: Allow <ENVIRONMENT> nodes to request a different Puppet environment for a one-time run

    Once the child environment node group is set up, give it the rule (agent_specified_environment ~ .+). Do not pin any nodes to this node group.  

Results

The resulting environment node groups has a format similar to this:


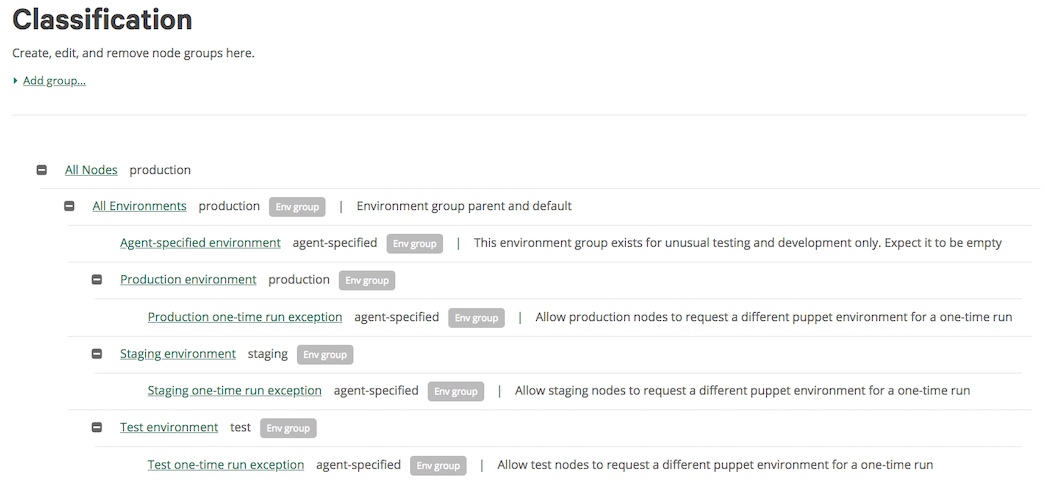
Now that your environment nodes groups are configured, we can deploy new code to your nodes.